Garage Finishing
- Parking
- Storage
- Living space
- Apartment
- Workshop
- Hobby room
- Game room
Garage finishing can also be any combination of these ideas. It can be as simple or complex as you wish. It's all up to you.Whether you do it yourself or outsource it, finishing your garage will add functionality, space, and value to your home. The first step is to draw up a finishing plan. You might be finishing your entire garage at once, or you may be doing it a little bit at a time...like me. Either way, when tackling garage finishing, you need a plan. The way I see it, it's ok if the plan changes....but...
If you don't have a plan, then you won't get anything done.
Keep it simple! You don't have to spend hundreds for a professional to draw it up for you. Just go out in your garage, take a look around, jot down any ideas that come to mind, and follow the following guidelines...
First thing first! The electrical plan. Decide if you want more power receptacles in your garage. If so, then you may want to bring in one or two 20-amp circuits which you can use for things like power tools, air compressors, vacuums, refrigerators, welders, etc. Also, as I'm discovering lately, it's an added bonus in the garage finishing process to have a sufficient amount of receptacles as the garage finishing work continues. You can also have receptacles flush with the ceiling so you can plug in things like heaters, different kinds of lighting, parking gadgets, etc. If you're qualified to do your own electrical work, make sure it satisfies local and national codes, otherwise, hire an electrician. You'll quickly and often appreciate the convenience of extra receptacles in your garage.
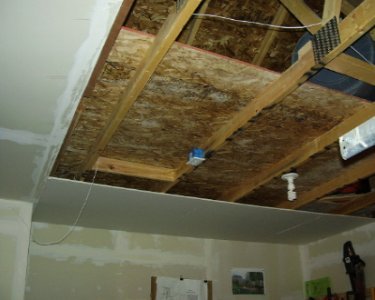
Ok, so now you've got your new receptacles installed and working. Now, it's time to think about more garage finishing... your ceiling. Do you have any unfinished attic space that you could use for storage? If so, this is your next step. When dealing with attic storage, pay attention to the spacing of the trusses. In some garages, they may be 24 inches apart, instead of the standard 16 inches apart.
If the attic trusses in your garage are 24 inches apart, you have to consider storing light-weight items only, but if they're only 16 inches apart, then you can store some heavier items. As a rule of thumb, don't store many heavy items in your garage attic space! Use common sense and keep it safe.
So....how do you go about creating storage space in your garage attic? Well..it's entirely up to you. It depends on your unique situation and garage finishing needs. I'm currently chipping away at mine. The following is a basic description of the way I've been finishing my garage.
I set 4X4 sheets of plywood (that I cut from 4X8) on top of the trusses for the base of my storage. I installed a few 2X4s perpendicular and level to the bottom of the trusses. This was to make sure the storage plywood would hold my weight as well as the weight of the stuff Ive stored, all in addition to my own weight while I crawl around up there.
Something else to consider is adding a skylight to your garage. It's a great way to get more day light without turning on a switch. I know it's a luxury, but oh, would it be worth it! Because of gravity, finishing garage ceilings is probably the most difficult part of the garage to finish. Its definitely a two-person job to place and secure the drywall in a garage ceiling. You will need to frame the outline of your garage level with the bottom of the trusses. Once youve got it all framed out, go ahead and dry wall away! If you're not sure about how to hang drywall, then click here for a brief tutorial.
How to finish garage walls:
The next items in the garage finishing process are the walls. Finishing the garage walls is really not too difficult. Like the ceiling, make sure you are satisfied with the amount of garage receptacles you have before you begin dry walling. Something else you may want to consider is installing a window in your garage. Like a skylight, it will give you a tremendous amount of light in the daytime.
Taking it one step further, you may even consider installing a service door that goes to your back yard. Talk about convenience! Service doors are wonderful. You can get them solid or with a window. I prefer the window. Also, if youre going to take the time to drywall, then take the time to insulate! Im not an HVAC expert by any means, but I do know that when I insulated my garage, it made a world of difference in the wintertime, and with the ever-increasing energy bills we all face, the insulation will definitely pay for itself.
If you'd like to know more about how to tape and mud your garage, then follow this link for a basic overview. Once the taping and mudding process is complete, you're ready to paint your drywall.
How to finish garage floors:
The last phase of garage finishing is the garage floor. An unfinished concrete garage floor is cold, and its a magnet for automobile fluid, paint, and stuff your car drags in stains. Installing a garage floor covering will instantly make a world of difference in the overall look, feel, and functionability of your garage.


